Budget Component Formats
Settings > Budgeting > Component Formats
Formats define a screen format for budgeting on a component or detailed basis and control settings for whether components are required for budget entry and/or permissions for which users may access the component detail. Each format should be assigned to an account range in budget format account ranges.
Main Menu Options
New: Click New, then the Template button to insert one of the standard formats as a beginning point. Changes can then be made to customize the format.
Edit: Opens the highlighted format for editing.
Delete: Deletes the highlighted format.
Copy: Allows an existing (highlighted) format to be copied and saved to a new name. Change the name (Format ID) of the new format, make appropriate changes, and click Save.
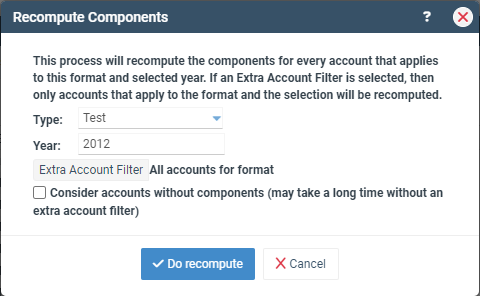
Recompute Components for Format: This process recomputes component lines for accounts to which the selected format is applied. It should be used when Format default values are changed after users have entered budget figures. As it may impact many accounts it is recommended to be run after hours when users are not active in the system.
- Type: If the Format is used for (All) budget types, the Type dropdown should be used to specify which budget type for the selected year should be recomputed. If the format is specifically applied to a single budget type, the Type dropdown will not be visible.
- Year: Specify the year of the Budget type being recomputed.
- Extra Account Filter: If only specific accounts should be computed, identify them using the Extra Account Filter. If no filters are added the system will recompute all accounts assigned the selected format.
- Set default values for column (monthly formats only): When the box is checked the system will update the default value for a single data column. By not selecting the checkbox, the system will update all default values for all periods.
Monthly Formats: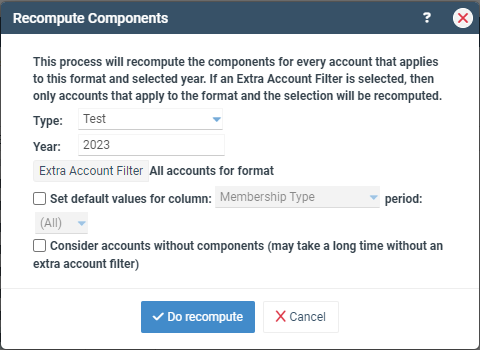
Annual Formats:


Column Headers
Format ID: The name used to identify the format.
Budget type: The budget type to which the format is applied. If set to All, the format is not limited to a specific budget type.
Effective year: The year the format initially took effect.
Entry: The entry type for the format, Monthly or Annually.
In Use: If checked, the format is currently listed with an account range in Format Account.
Format Creation/Edit
Template: This section lists predefined budgeting templates for various accounts. When adding a new format, choose a template (or copy an existing format) and customize it as needed.
Format ID: A name to identify the format. If different formats are used for budgeting vs. forecasting, the format ID must be exactly the same on both formats. Format Account Ranges designate one name for a range of accounts, regardless of the budget type. The year should not be included in the name.
Budget type: The budget type to which the format is applied. If set to All, the format is not limited to a specific budget type.
Effective year: The year the format will take effect. Formats are not required to be set every year; they stay in place until a new format with a new effective year is created. When adding a format with a new effective year, do not delete the old format. Doing so will affect how detailed the historical budget component is displayed.
Click Settings
Enter components:
- Monthly: If component details are to be entered monthly, use a monthly format. The months are listed vertically on the component entry screen.
- Annually: Use an annual format if component details are to be entered as a single yearly amount only. Amounts are entered as single annual line items and are distributed across months according to the Distribute to months settings.
Browse access level: Controls which users may access component details when viewing budgets. Only users with at least the selected access level for the Budget Entry permission may open the component detail screen for any accounts that have the format applied.
Require modify level to browse: When checked, only users for whom the account meets their Budget Entry tab selections in Account/Object Restrictions may access the component detail. (i.e., A branch exec is set to browse all accounts in multiple branches but can enter budgets for only their branch. The user needs to see the monthly budget amount for all accounts but may not access the component detail for any accounts other than those for which they have permission to enter budgets.)
Force component entry: This option deactivates monthly budget formula tools and requires that the component screen be accessed to enter budget details. If set to Force, it prevents all monthly entries. If set to Force upon save it confirms entry has been made only through components when the user clicks Save.
Include monthly totals: For monthly budget entries, if checked, this option includes a total for each month's row.
Distribute to months: For annual component entry, this option controls how the annual amount entered is distributed across months.
- Equal: Distributes the annual amount evenly across all 12 months.
- Last year: Distributes the annual amount according to budget distribution for the last budget year.
- Custom: Distributes the annual amount according to the percent or number entered through the Distributions icon.
Allow Change in Distribution: This enables the user to manually adjust the distribution. Conversely, if left unchecked, the system will enforce the default distribution.
Prompt to default the prior year’s components: When no components exist the system will prompt them for whether they want to copy components from a prior budget year as initial budget component detail.
- From budget type: Indicates the budget type from which component detail should be copied.
- Copy comments from prior year: This will duplicate the comments from the Budget comment section of the previous year.
Redistribute using default distribution (annual formats only): Redistributes the prior year's budget components according to the current budget format distribution method.
Force distributions to match annual amount (annual formats only): While annual components are initially distributed according to the distribution method, they may be modified. This option requires the distributions to equal the overall budget amount entered.
Hide prior month forecasts for actual/forecast: When viewing component details for Actual/Forecast, this option, when checked, will hide all months for closed periods. If unchecked all months will display with closed periods grayed out to entry.
Include merit increase (annual formats only): If checked, the component screen will display the Merit Increase icon. See merit increase for additional setup.
Always load dft values for read-only columns: When unchecked, the system will only load default values for newly added component lines.
Default number of components (monthly formats only): Sets the default number of component rows displayed when a user brings up the components screen for the first time. When All months are selected, the number of components entered is applied to all months. If Per Month is selected, different numbers of components may be set on a month-by-month basis.
Force number of components: Sets the default number of component lines and prevents adding or deleting.
Allow add/delete component for specific month: If unchecked, component lines may not be added or deleted for any individual month. Selected component lines must instead be added or deleted for all months.
Column for budget placement when no components exist: When budget amounts are entered at the monthly level, the system creates an individual component detail line with the amount entered into the format column indicated. This ensures component detail and monthly budget amounts stay in sync.
Column for monthly distribution budget adjustment (annual formats only): When annual amounts are entered, and monthly distributions are changed, reducing the annual amount, the column indicated will be used for the applied adjustment amount.
Columns
Add: Add a new row. Each row represents a new sequential column to be displayed in the component screen.
Delete: Deletes the highlighted grid row.
Delete All: Deletes all rows in the grid.
Move Up/Down: Reorders the rows. Moving a row up will move its associated column to the left in the component screen display. Moving a row down will move its associated column to the right in the component screen display.
Conditional Default Values: Allows for a column’s data to be auto-determined based on information entered into a separate selection column.
- Specify the Selection Column, the column containing the data that will be used to determine the default value(s)
- In the grid, specify
- The Selection Column Value is the value used to determine the default value.
- The Return Value is the default value to be used when the Selection Column Value is present in the Selection Column.
Default Value Query: Allows for default values to be defined according to the database query.
Dropdown Values: Grid entry of values to be displayed for selection from a dropdown in the highlighted column
Dropdown Value Query: Allows for dropdown values to be defined according to the database query.
Column Grid
Note: Each row entered represents a successive column in the component screen displayed to the user for entry
Header: The description to display for the data column.
Type: Click on the dropdown arrow and select a data slot for the computer to hold the information to be entered in this column.
- Budget: The field used to store the overall entered or calculated budget.
- Number: Allows up to 35 number columns for use in calculating the budget.
- Text: Allows up to 15 text columns for descriptions, comments, or dropdown selections.
- Checkbox: Allows up to 20 checkboxes, which are typically used in conjunction with budget allocations.
Length: The maximum length of numbers/characters that may be entered into the field.
Decimals: The number of decimals stored in the budget database for number columns. Note that while the number of decimals displayed in the budget entry is controlled by the format indicated, the budget entered will be rounded to the number of decimals indicated. Ex. If the number of decimals is listed as 0, the budget will be rounded to the nearest whole dollar.
Format: Determines how numbers and budget columns are displayed to the user. Common formats are listed in the drop-down. To ensure stored budgets match the displayed calculated amount, the number of Format decimal places should match the number of decimals set in the Decimals column.
Dft Value: The default value used for new component detail lines. A single value may be used, or the search icon may be used to specify separate values for each month.
Width: Specify the width of the column in pixels. If Auto is chosen, the column will be auto-sized to fit only the column header, not the column data.
Read Only: If checked, the column will not allow manual entry.
Formula: Budget and number columns may be calculated by the formula entered.
- All formulas must begin with an equals (=) sign.
- To reference another column in the same row, use “N” plus the data slot number (i.e., N2 - refers to Number 2).
- To reference another column in the prior row of the same month, use “P” plus the data slot number (i.e., P2 - refers to Number 2 in the prior row).
- To reference another column in the same row in a prior month, use “R” plus the data slot number (i.e., R2 - refers to Number 2 in the prior month’s relative row).
- Key any whole number or decimal to specify a fixed number.
- Use the standard operators (+ - * /)
- Parentheses are supported but not layered within each other.
- Formulas are calculated from left to right and do not follow the order of operations (i.e., =N1*(N2+N3)*0.01
Drop-down Values: Text displayed for use selection via dropdown.
- Text values may be manually entered into the column separated by commas
- Text values may also be entered by clicking Dropdown Values (see above)
Total: If checked, the column will have a total calculated for each month and annually.
Hide: If checked, the column will be hidden.
Frozen: If checked, the component screen will always display all columns to the left of and including the highlighted column when scrolling to the right.
Copy From Next Year: If checked, when the user copies components from a prior year, the highlighted column’s value will be copied. Columns that contain default values that change from year to year are not typically checked.
Apply Merit Increase (annual formats only): If checked, the highlighted column amount will be subject to the format’s specified merit increase.
Important: Any format changes made that involve calculations are not automatically applied to components in existence prior to the format change. Changes to default values require the Recompute Components for the format process to be completed.
If changing a default value:
- Edit the budget format to update the default value.
- Access the main Budget Formats screen, highlight the desired format, and click Recompute Components for Format.
- See Recompute Components for Format for process instructions.
Click here to view a few budget format examples
Click here for a list of considerations and suggestions when setting up initial budget formats.