Adding A.I. Template Pages
Settings > Accounts Payable > Digital Invoice Templates
Video Tutorial
Click the play button below for a video tutorial. This tutorial is about 23 minutes long. Written instructions are below the video.
NOTE: If viewing from the right-side screen, to open the video on a larger screen, use the "Open in full site" link at the bottom left of the help display. If you are already viewing from the full site, click the play button below to begin the tutorial.
Step-By-Step Instructions
To add A.I. template pages, complete the following steps:
-
Access the Digital Invoice Templates page by clicking Settings > Accounts Payable > Digital Invoice Templates from the menu bar.
-
Highlight the Master Template.
-
Click Edit.
The Edit Digital Invoice Capture Template page will display:

-
Click the New icon and select A.I. Template.
The New A.I. Template Page screen will display: -
Click Upload Template Image.
The Select Template Image file selection screen will display: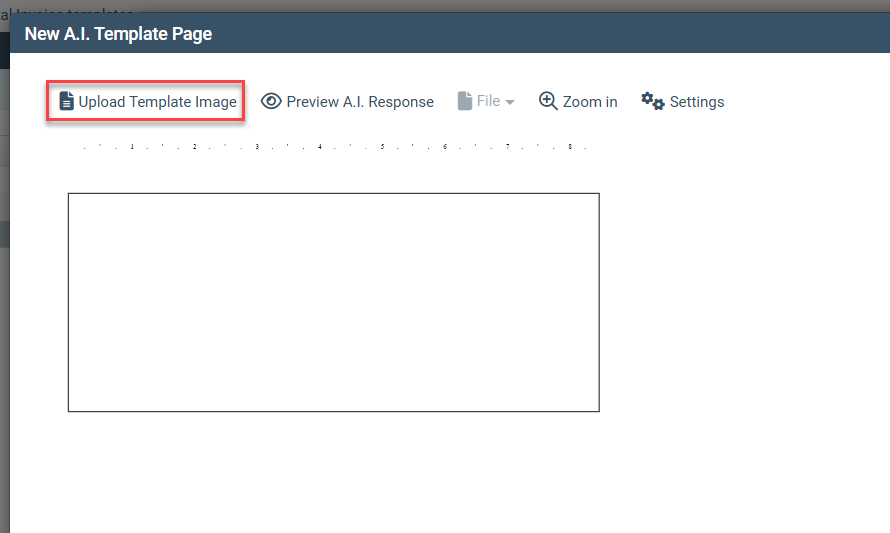
-
Click + Select Files… to pull a document from a file location or drag and drop a file in the yellow Drop files here… box. The selected file name will be displayed.
-
Click OK.
-
If the invoice file selected contains multiple pages, the Select Foundation Image screen will be displayed. Select the image to use for the template page.
-
Once the desired page has been highlighted, click OK.
The New A.I. Template Page screen will be re-displayed with the selected image and available Data Selections. -
Follow the Data Selections instructions below for selecting data to capture and establishing default settings for the Template page.

Data Selections
A.I. Data Selections indicate what data fields should be captured from the invoice image.
By default, the following fields are pre-selected:
-
Invoice Number
-
Invoice Date
-
Due Date
-
Purchase Order (if the purchasing system is activated)
-
Comments
-
Amount(s) – Total Only
When data field boxes are checked, the corresponding information is captured using the selected Identification Method (indicating specific locations is not required):
-
System Inferred – the data is identified by A.I. interpretation.
-
Custom Text – the data is identified using specific text. When selected, a text entry box will appear.
One of the following three options may be used to identify what amounts should be captured from invoice images:
-
Total Only – A single GL distribution line will be created for the total invoice amount.
-
All – GL distribution lines will be created for all amounts present in a list of invoice charges (ex., If an invoice contains a list of ordered items with unit prices, this option may be used to create individual GL distribution lines for each item).
-
Specific – GL distribution lines will be created for all amounts identified using specific text (ex., If an invoice contains required amounts in multiple locations throughout the image, this option may be used to create individual GL distribution lines with the amounts identified by specific text).
NOTE: The Invoice Number and Comments fields allow for the specification of additional instructions as needed.
-
Invoice Number
-
Append text to Invoice Number (checkbox) – additional text may be added before or after the data captured from the invoice image. Text may be manually entered, and/or variables may be added (ex., The invoice date may be added to the invoice number in various formats).
-
Append text to Comments (checkbox) - additional text may be added before or after the data captured from the invoice image. Text may be manually entered, and/or variables may be added.
Capturing Amounts and Assigning GL Accounts (Total Only):
Indicate the identification method (System Inferred or Custom Text).

-
Custom Text may be used when unique information from the image is used as the invoice number (e.g., account number, meter number, etc.).
-
If GL accounting is required enter the following information (only one may be applied):
-
Default GL account – the GL account that should always be used for the captured amount.
-
Conditionally assign GL accounts – the GL account that should be assigned to the captured amount under specified conditions.
-
Default Transaction Code – the Transaction Code that should always be applied to the captured amount.
-
Conditionally assign Transaction Codes – the GL account splits that should be applied to the captured amount under specified conditions.
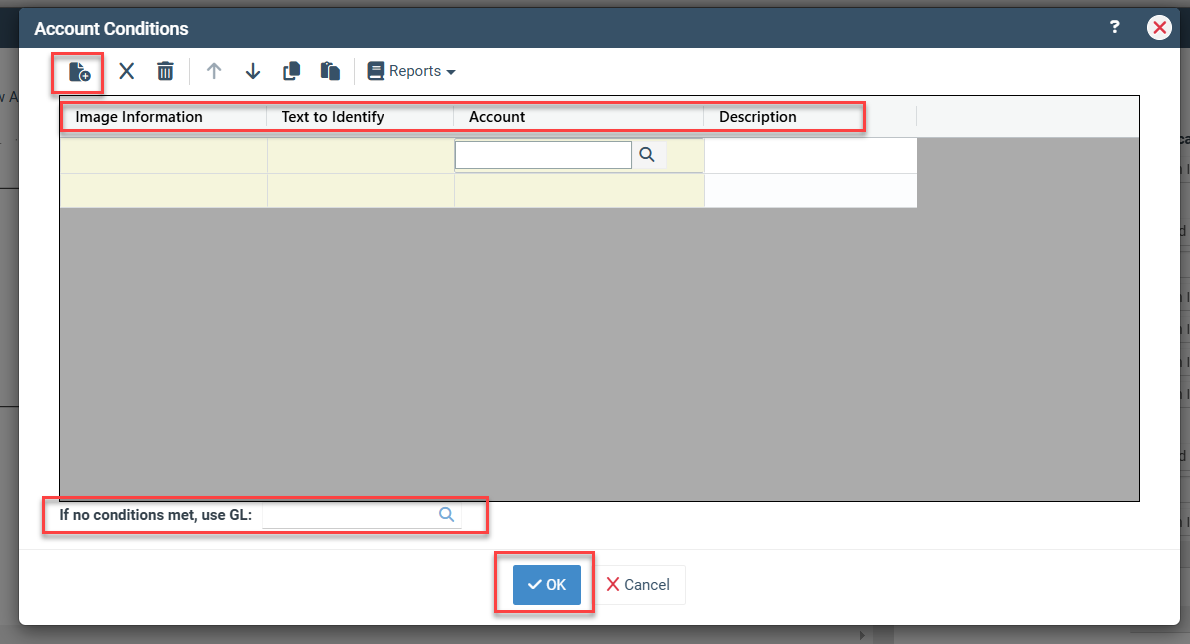
Conditionally assign GL Accounts:
-
Check the box for Conditionally assign GL Accounts.
-
Click Conditions.
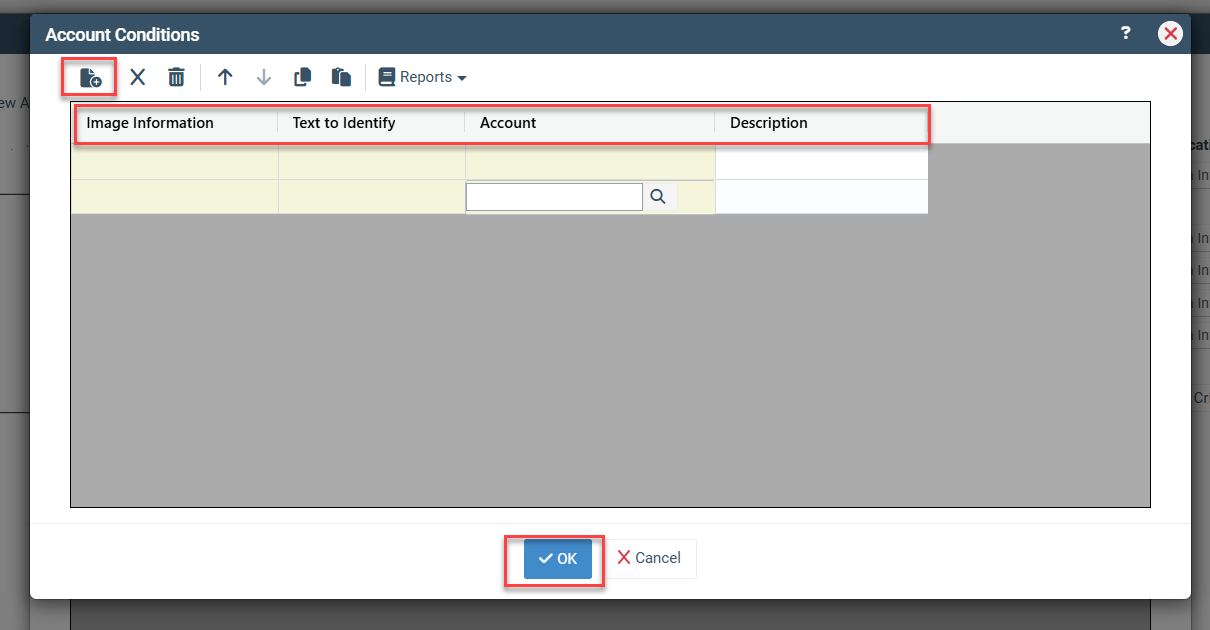
The Account Conditions screen will open.
-
Click New.
-
Enter the following:

-
Image Information – the image data that will be evaluated for the Text to Identify (ex. Ship-to address, Vendor Account #, Item ID, etc.).
-
Text to Identify – the specific text in the Image Information that when present should result in the assignment of the associated GL account.
-
Account – the GL account that should be assigned when the Text to Identify is present in the Image Information.
-
Click New to add additional lines as needed.
-
Enter a GL account in the If no conditions are met, use GL if a default GL account should be assigned in cases other than those listed.
-
Click OK.
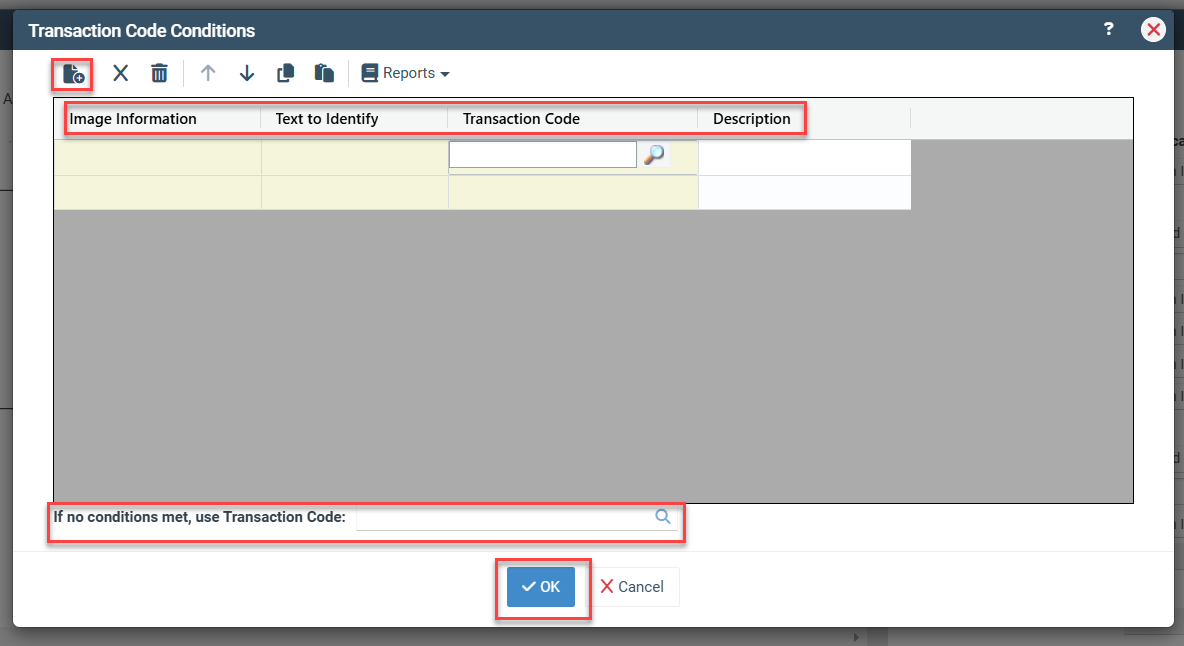
Conditionally assign Transaction Codes:
-
Check the box for Conditionally assign Transaction Codes.
-
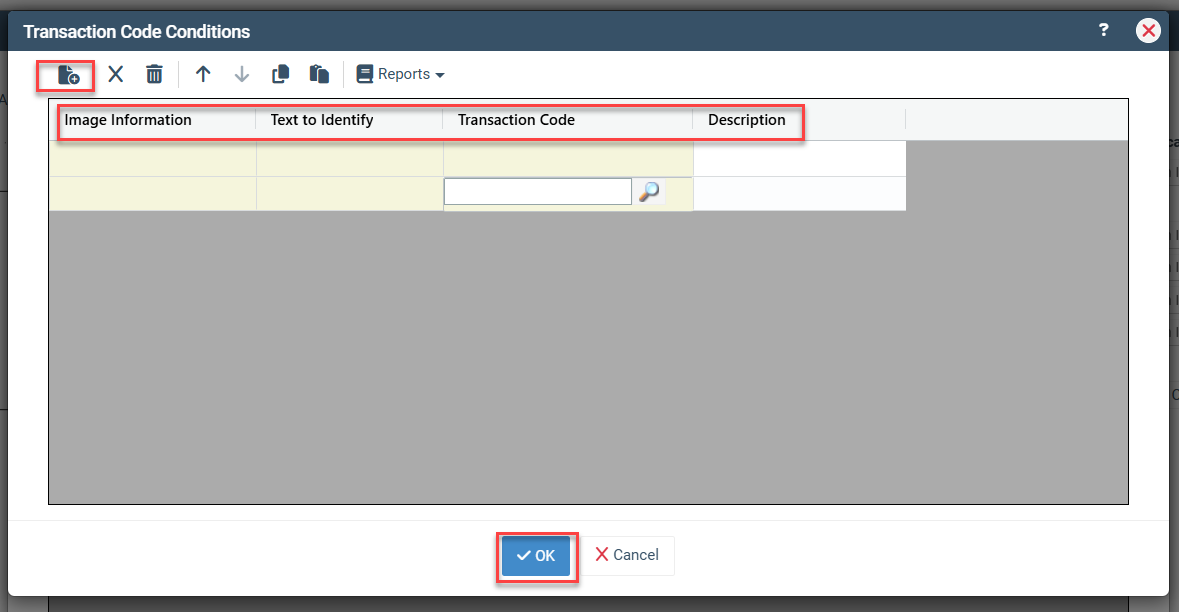
Click Conditions.
The Transaction Code Conditions screen will open.
-
Click New.
-
Enter the following:
-
Image Information – the image data that will be evaluated for the Text to Identify (ex. Ship-to address, Vendor Account #, Item ID, etc.).
-
Text to Identify – the specific text in the Image Information that when present should result in the application of the associated Transaction Code.
-
Transaction Code – the Transaction Code that should be applied when the Text to Identify is present in the Image Information.
-
Click New to add additional lines as needed.
-
Enter a GL account in the If no conditions met, use Transaction Code if a default Transaction Code should be applied in cases other than those listed.
-
Click OK.
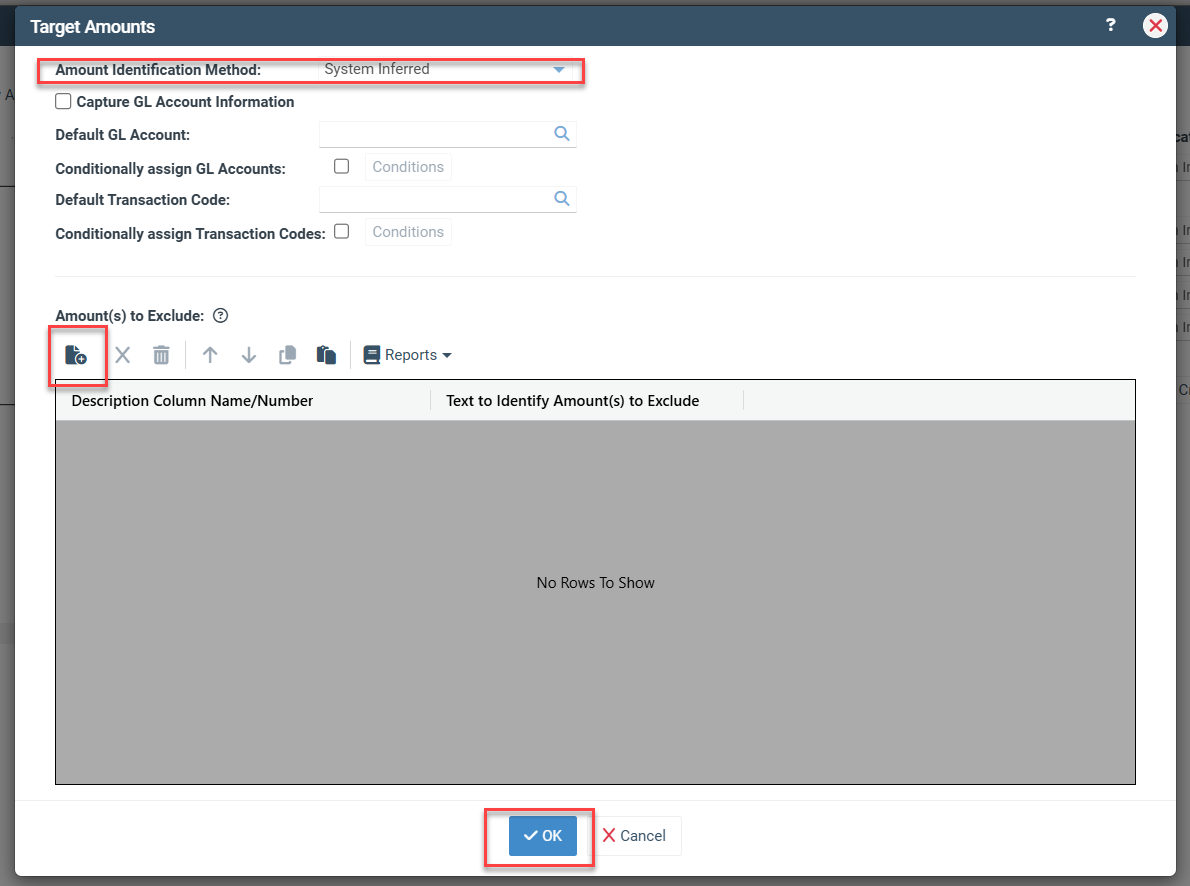
Capturing Amounts and Assigning GL Accounts (All)
Change the amounts drop down to All.

-
Click Target Criteria.
The Target Amounts screen will display
-
Indicate the Amount identification method:

- System Inferred – the system will determine the column from the invoice image that contains the list of amounts.
-
Column Name/Number – the header label of the column containing the list of amounts. If the column does not have a header label, enter the column number (assume the columns are numbered from left to right).
-
Click Capture GL Account Information if GL account information is to be captured from the image.
-
Enter the Header Label or Column Number for the list column containing the GL account information.
-
If GL accounting is required, enter the following:
-
Default GL Account – the GL account that should be used for captured amounts when no conditional GL Account or Transaction Codes are applied.
-
Conditionally assign GL Accounts - the GL accounts that should be assigned to the captured amounts under specified conditions (see below).
-
Default Transaction Code – the Transaction Code that should always be applied to the captured amount.
-
Conditionally assign Transaction Codes – the GL account splits that should be applied to the captured amounts under specified conditions (see below).
-
To exclude amounts from the listed charges, enter lines into the Amount(s) to Exclude grid
-
Click New.
-
Enter the Header Label or Column Number for the list column containing charge descriptions.
-
Enter the Text to Identify the amount(s) that should be excluded (ex. Sales tax, subtotal, etc.).
-
-
Click OK.
Conditionally assign GL Accounts:
-
Check the box for Conditionally assign GL Accounts.
-
Click Conditions.
The Account Conditions screen will open.
-
Click New.
-
Enter the following:

-
Image Information – the image data that will be evaluated for the Text to Identify (ex. Ship-to address, Vendor Account #, Item ID, etc.).
-
Text to Identify – the specific text in the Image Information that, when present, should result in the assignment of the associated GL account.
-
Account – the GL account that should be assigned when the Text to Identify is present in the Image Information.
-
Click New to add additional lines as needed.
-
Click OK.
Conditionally assign Transaction Codes:
-
Check the box for Conditionally assign Transaction Codes.
-
Click Conditions.
The Transaction Code Conditions screen will open.
-
Click New.
-
Enter the following:
-
Image Information – the image data that will be evaluated for the Text to Identify (ex. Ship-to address, Vendor Account #, Item ID, etc.).
-
Text to Identify – the specific text in the Image Information that, when present, should result in the application of the associated Transaction Code.
-
Transaction Code – the Transaction Code that should be applied when the Text to Identify is present in the Image Information.
-
Click New to add additional lines as needed.
-
Click OK.
Capturing Amounts and Assigning GL Accounts (Specific)
Change the amounts drop down to Specific.

-
Click Target Criteria.
The Target Amounts screen will display. -
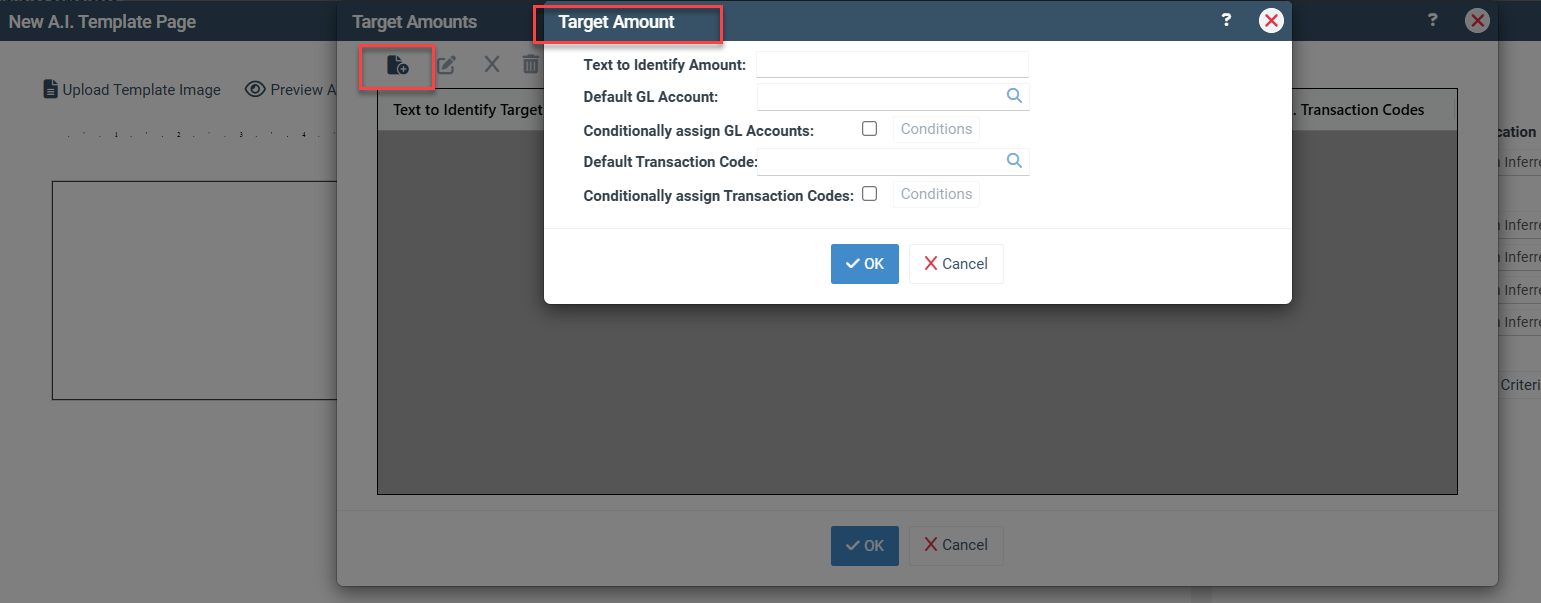
Click New.
The Target Amount screen will display.
-
Enter the Text to Identify Amount – the specific invoice image text that identifies the amount to be captured.
-
If GL accounting is required, enter the following:

-
Default GL Account – the GL account that should be used for captured amounts when no conditional GL Account or Transaction Codes are applied.
-
Conditionally assign GL Accounts - the GL accounts that should be assigned to the captured amounts under specified conditions (see below).
-
Default Transaction Code – the Transaction Code that should always be applied to the captured amount.
-
Conditionally assign Transaction Codes – the GL account splits that should be applied to the captured amounts under specified conditions (see below).
Conditionally assign GL Accounts:
-
Check the box for Conditionally assign GL Accounts.
-
Click Conditions.
The Account Conditions screen will open.

-
Click New.
-
Enter the following:

-
Image Information – the image data that will be evaluated for the Text to Identify (ex. Ship-to address, Vendor Account #, Item ID, etc.).
-
Text to Identify – the specific text in the Image Information that, when present, should result in the assignment of the associated GL account.
-
Account – the GL account that should be assigned when the Text to Identify is present in the Image Information.
-
Click New to add additional lines as needed.
-
Click OK.
Conditionally assign Transaction Codes:
-
Check the box for Conditionally assign Transaction Codes.
-
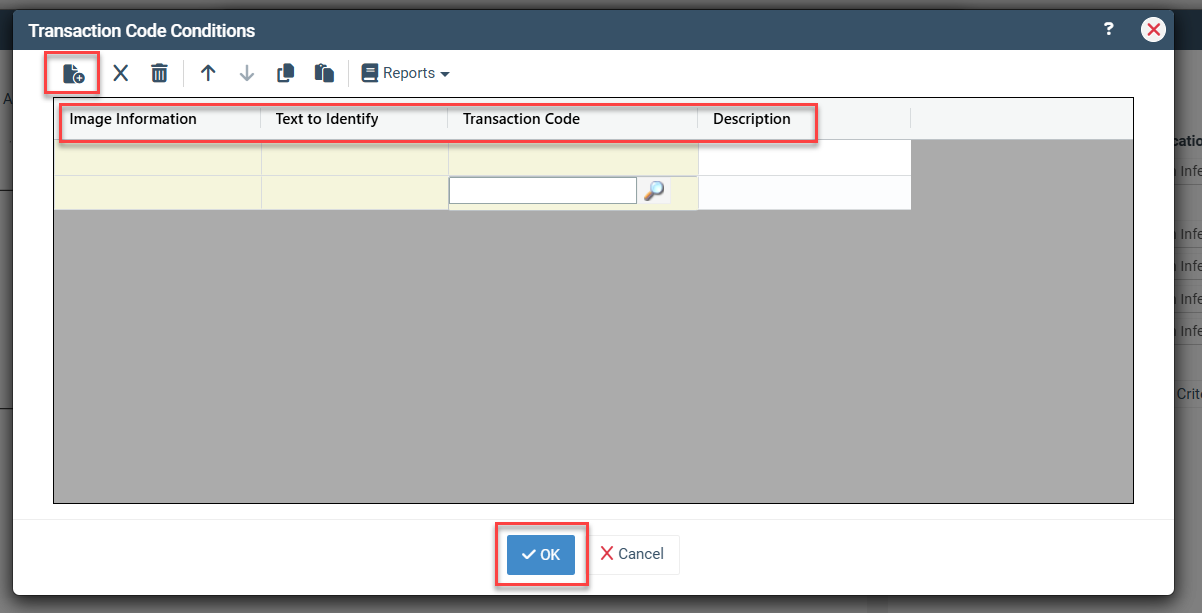
Click Conditions.
The Transaction Code Conditions screen will open.
-
Click New.
-
Enter the following:
-
Image Information – the image data that will be evaluated for the Text to Identify (ex. Ship-to address, Vendor Account #, Item ID, etc.).
-
Text to Identify – the specific text in the Image Information that, when present, should result in the application of the associated Transaction Code.
-
Transaction Code – the Transaction Code that should be applied when the Text to Identify is present in the Image Information.
-
Click New to add additional lines as needed.
-
Click OK.
Settings (Adding Defaults)
The following will describe how to change system settings for templates. Through system settings, defaults may be set for Vendor ID, Payment Card/Vendor, Approval Group (if invoice approval is activated), invoice number, and comments.
From the Edit Digital Capture Template screen, click Page Settings.

General Settings Tab
Default settings are pre-selected.
-
Capture Distributions Only – in the event that an invoice is multiple pages and an amount of information is needed from more than the primary invoice page, checking the box for Capture Distributions Only and selecting the primary template page will ensure that any information captured is added to the invoice created for the primary template page.
-
Default Vendor ID – all invoices created using the template page will use the selected Vendor ID.
-
Default Payment Card/Vendor - all invoices created using the template page will have the selected Payment Card/Vendor ID assigned.
-
Default Approval Group – all invoices created using the template page will have the selected approval group assigned.
-
Conditionally assign approval group – approval groups are assigned to created invoices according to identified page selections.
Advanced Settings Tab
Default settings are pre-selected.
-
Default PO Close Method – the PO close method initially assigned to invoices at capture.
-
Default Invoice Number – default manually entered text and/or variables used for invoices created using the template page. If the Invoice Number is checked in Data Selections, this field is not accessible.
-
Default Comments – manually entered text and/or variables used as the default comment for all invoice GL line items created using the template page. If Comments is checked in Data Selections, this field will not be accessible.
-
Default File Name – the default naming convention for source files attached to invoices created for the template page. The default variable @Fixed.OriginalFileName@ results in the source attachment retaining its original file name.
-
Additional A.I. Instructions – this text field may be used to provide custom instructions for the system A.I. Special instructions are used to accommodate data issues not addressable with existing system settings.
Saving a Template Page and Adding Page Selections
Saving the template page stores data selections and default settings for the template. The following steps will describe how to save a template and add Page Selections, which provide criteria for the system to determine when to apply the template page instructions.
Saving a Template Page:
-
Once all settings have been established, click File – Save.

-
Enter a Category to identify the template page. This is optional and serves to help organize the template page list.
-
Enter a Page Name to identify the template page.
-
Click Save.
-
Upon clicking Save, the Page Selections menu will appear.

Adding Page Selections:
Page Selections identify when the template page instructions should be applied to invoice images. To add template page selections, complete the following steps:
-
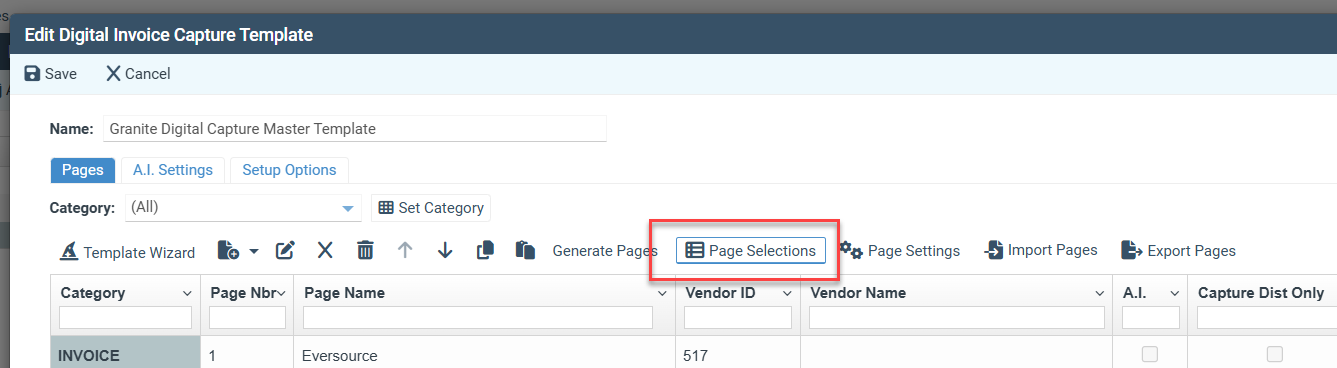
Click Page Selections to add a new Page Selection.
-
Click New.
-
Select the page selection type in the Column field.

-
Text in Image – identifies text located in the image.
-
Image Name – identifies a page by its assigned attachment name at capture.
-
File Name – identified a page by its original filename.
-
If the Page Selection indicated is Text in Image, the invoice image will be displayed, and a red identification box will be added.
-
Move the identification box to an area of the image containing unique identifying information. Typically, this includes a vendor name, address, and/or an account number. Expand the box to encompass the area, including and around the information, and click OK.
-
The Get Text function will display all text contained within the identification box and add it to the Value field.
-
Select the comparison type in the Comparison field. This criteria will be used to compare the text in the value field against invoice images. When the comparison criteria are met, the template page will be applied to Capture invoice information.
-
Add additional Page Selections as needed.
-
Click OK.
-
Click Save.
The template is now saved and will be applied during the invoice Capture process.